

Dancer Foot Care for Happy Healthy Feet
Posted by Samantha A. on 3rd Jun 2024
Strong, healthy feet are essential for dancers! They are the foundation that supports you through leaps, pirouettes, pointe work, and every step in between. Proper foot care can help prevent injuries, improve balance and technique, and keep you dancing pain-free. This guide will provide dancers with helpful tips on proper toenail care, blister prevention and treatment, and callus management. Whether you’re a seasoned pointe dancer or just starting out, these tips will help you maintain healthy feet and avoid common foot problems.
Toenail Care
Regular toenail care is crucial for preventing painful ingrown and bruised toenails.
Here are some tips for dancers, especially those who wear pointe shoes:
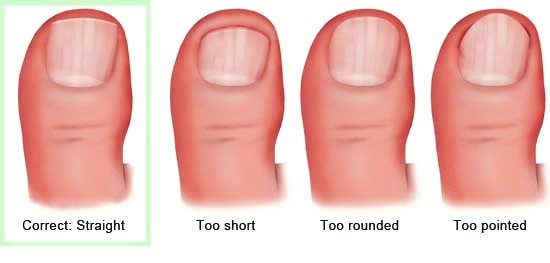
- Trim toenails straight across, following the shape of your toes. Avoid over rounding the corners, which can encourage ingrown toenails.
- Keep toenails short, but not too short. Press your finger vertically along the tip of your toe, if you feel your toenail, this will also be the first thing that hits your shoe – which can lead to bruised toenails, ouch!) So, to keep your toes happy file toenails to match the curve of your toe when compressed (like inside pointe shoes) to avoid them hitting the box of your shoe.
- Use a coarse nail file for better control and to prevent trimming too short.
- Finish with a fine grit file to smooth edges. Once you’ve trimmed your toenails to the desired length switch to a fine-grit file to finish shaping your nails and smooth the edges. Smooth edges make your toes happier and more comfortable when pressed together inside your shoes.
- If you prefer to clip your toenails use a sharp toenail clipper. Dull clippers can crush the nail, making it more prone to ingrowing.
Blister Prevention
Blisters are a common complaint among dancers, but there are many ways to avoid them!
Here's how to stop blisters before they start:
- Wear properly fitted dance shoes. Ill-fitting shoes are a major cause of blisters, shop locally for your dance shoes and get fit by an expert! A pointe shoe that’s expertly fit should cause minimal blisters (except maybe during lengthy rehearsals). You should also avoid too much “toe junk” lambs wool, spacers, thick toe pads, etc. If you have too much “stuff” in your pointe shoe this is a clue that it isn’t a perfect fit.
- Be aware of foot sweat and control moisture. Blisters are caused by friction, and studies have shown that increased moisture levels of the feet increase skin friction and the likelihood of blisters. Everyone’s feet sweat different amounts, so if you notice your socks are moist or know that your feet are damp after class this is for you! Here are some moisture control tips:
- If you have long rehearsals in dance shoes that require socks, keep spare pairs in your dance bag, allowing you to switch socks during breaks and keep your feet dry and happy.
- Pointe dancers can use Pointe Powder to absorb moisture in your shoes, simply sprinkle a smidge inside your toe pads before putting them on. Pointe Powder is specially formulated to keep your shoes and feet smelling fresh all day!
- Pay attention to warning signs. Redness and sore spots are early signs of blisters. Callouses are where your feet regularly rub, they’re great for protection but can lead to deeper blisters if they get bulky. If you feel a rub spot forming and must keep dancing in the same shoes, we recommend using a body glide stick, applying moleskin, or Dancer Dots to the area that’s rubbing.
- How to use moleskin: Clean and dry the area around your rub spot or blister, cut a piece of moleskin that’s three-quarters of an inch larger than the spot, fold in half and cut a half circle out of the mole skin (about the size of your blister/rub spot) creating a donut shape when unfolded, remove adhesive backing and place moleskin around your rub spot. Be sure not to place the moleskin ON your blister because the strong adhesive will peel off the top layer (yikes!). If it’s a large blister or rub spot you can apply two layers of moleskin to build up the thickness and reduce irritation.
Blister Treatment
Even if you take all the right preventative steps sometimes blisters still happen... Everyone has different skin, and some people are more prone to blisters than others.
When blisters do happen (hopefully rarely!) here’s how to treat them:
- Don’t pop your blister, especially if it’s small or even medium sized. Popping blisters can increase your risk of infection because it creates an open wound. For un-popped blisters, you must dance on we recommend applying a blister bandage (A bandage with hydrocolloid adhesive that absorbs moisture and creates a cushioned gel environment that supports healing).
- Drain large or painful blisters properly to avoid infection. It’s incredibly important to drain blisters in the correct way to avoid infection! Clean the area around the blister and sterilize a needle with rubbing alcohol and water. Make a small hole at the edge of the blister and (gently) press out the fluid, wash the area again and pat dry. Be sure to leave the skin over the blister, it helps protect the wound from infection. After draining you can either apply antibiotic ointment and a sterile bandage or (our preferred method) apply a blister bandage which will facilitate continued draining.
- Gently clean and bandage popped blisters. If you take off your shoes and realize the rub spot you’ve avoided dealing with has turned into a blister and popped, the first step is to clean the wound. Wash the area with warm water and gentle soap, smooth down the skin flap that remains and either apply antibiotic ointment and a sterile bandage or apply a blister bandage. If you need to continue dancing on the blister we recommend using a blister bandage which will stay put more effectively and offer some cushion.
- Whatever your situation, continued care is key! Change your bandage daily and whenever it gets dirty or wet and keep an eye on the blister to make sure it doesn’t get infected.
Ok enough about blisters, I don’t know about you but I’m getting queasy. Moving on to…
Callus Management
Calluses are areas of thickened skin that develop on the feet to protect them from friction. While a thin layer of calluses protects your feet, too much callus can lead to discomfort. Finding the right balance is a personal preference, but as a rule of thumb if you start feeling edges or corners on your calluses it’s time to act.
Here are tips on how to manage your calluses and keep your feet smooth but protected:
- Soak your feet in warm water to soften calluses. Soaking your feet is a key step when dealing with calluses, it will soften the skin on your feet and lift the layers of skin that have built up. There are a variety of additives you can put in the water for an extra exfoliative boost:
- Epsom salt is a great option because it relaxes your tired muscles, reduces swelling, and soothes your skin.
- Apple Cider Vinegar can help soften hard calluses because of the high acid content. Mix together 4 parts water and 1 part apple cider vinegar and soak your feet for about 20 minutes.
- Tea Tree Oil has many wonderful properties, it’s antibacterial, antifungal and also an antiseptic. Simply add a few drops of tea tree oil to your foot bath and soak for up to 15 minutes, we don’t recommend soaking longer than 15 minutes with this method because tea tree oil is strong and can cause irritation of exposed for too long.
- Use a pumice stone to gently buff away excess calluses after soaking. Use circular motions to gently work at build up calluses, being careful not to overdo it, as this can irritate the skin. The goal isn’t to remove the callus completely, it’s to soften the edges and remove excess build up. You still want a little bit of callus because they help prevent blisters in normal rub spots.
- Moisturize your feet regularly to keep skin supple and prevent calluses from thickening. If you’d like an extra boost look for moisturizers containing urea, salicylic acid, or ammonium lactate, these ingredients will help gradually soften your calluses.
- Treat your feet to a good TLC routine about once a month. All dancer’s feet are unique, and everyone has different foot care needs, but generally you don’t want to let your feet go without maintenance for more than 4 weeks. If you’re a pointe dancer, then you may even want to increase toe nail care every 2-3 weeks.
By following these tips, dancers can maintain healthy feet and keep themselves dancing pain-free.
We hope this guide helps you keep your feet happy and health!